workshops
Introduction to Git and GitHub Part 2
Last Updated: 2023-11-19
In order to proceed with this lesson there are a couple things you’ll need to setup:
- Setup a GitHub account
- Go to https://github.com/ and follow the “Sign up” link at the top-right of the window.
- Follow the instructions to create an account.
- Verify your email address with GitHub.
- If you have not already done so, you will need to install git on your computer.
Sharing Your Work
In the previous section, we only recorded our changes locally, on our computer. Git, however, is designed to support distributed workflows across multiple computers, providing for robust collaboration and fully replicated copies of a project, should one contributor lose their files. To work, this kind of distributed workflow requires a remote server that operates as the portal from which changes are pulled from contributors and to which contributors push their changes. You could set up your own git server, but many publicly available servers already exist, one of which is GitHub.
In this distributed scenario, GitHub becomes the hub of your wheel, with each spoke representing a contributor authorized to participate on the project. To get things set up, you first need an account with GitHub. From there the steps are:
- Authenticate your computer with your GitHub account, so they can talk to each other securely
- Create an empty repository on GitHub
- Let git know on your local machine and in your project folder, that this remote repository exists
- Tell git on your local computer that this empty repository is the ‘hub’ or, in git language, the ‘remote’
- Upload, or in git language, ‘push’ your projector folder to the remote.
At that point, you have two copies of your work, one on GitHub – in the cloud – and one on your computer. From here, the general workflow is to work with your project locally, going through the process of editing files, staging these files, and committing these files. Onec you’ve done that, you can push these changes to GitHub, so the two repositories match again.
Authenticating your computer
We will use SSH, or the Secure Shell Protocol to securely communicate between your computer and GitHub. SSH uses keys to confirm identities, we create these keys on your local computer and then put one of them on GitHub.
Checking if you have an SSH key already generated
It’s possible you’ve generated an SSH key previously. If this sounds like something you think you’ve done before, you can check the contents of your ssh folder
ls -al ~/.ssh
If you get an output that contains these two files
id_ed25519
id_ed25519.pub
you can skip ahead to ‘Adding your public key to GitHub’. Otherwise, keep reading.
Generating an SSH key
Open your terminal (Git Bash on Windows) and enter the following, using the email address you’ve registered with your GitHub account:
ssh-keygen -t ed25519 -C "your_email@example.com"
You will be prompted to save the key to a file; press Enter to select the default location.
Enter a file in which to save the key (/Users/YOU/.ssh/id_ALGORITHM): [Press enter]
And lastly, you will be asked to type a secure passphrase to be used each time you authenticate. This is an extra layer of security that you may choose to skip. For security, it is recommended you enter a passphrase.
Enter passphrase (empty for no passphrase): [Type a passphrase]

Enter same passphrase again: [Type passphrase again]
You can set things up so that you don’t need to enter your passphrase every time you authenticate. For details on doing this, please see the GitHub documentation for Adding your SSH key to the ssh-agent. For now, we’ll continue with getting one of your generated keys – your public key – onto GitHub.
Adding your public key to GitHub
To find your public key, use your text editor to open the file id_ed25519.pub, and copy its contents.
nano ~/.ssh/id_ed25519.pub
Now, going to GitHub:
- Click on your profile icon in the top right corner to get the drop-down menu.
- Select “Settings”
- On the settings page, click “SSH and GPG keys”, on the left side “Account settings” menu.
- Select the “New SSH key” button on the right side.
- Add the title - this SSH key authenticates your computer, so pick a name that allows you to differentiate this machine from a second that you might have.
- Paste your SSH key into the field, and click the “Add SSH key” to complete the setup.
Congratulations, you’re all done!
To check your authentication from the command line, type:
ssh -T git@github.com
You’ll be prompted to enter your passphrase, and then should get the following output:
Hi [your username]! You've successfully authenticated, but GitHub does not provide shell access.
Create an empty repository on GitHub
Go to the GitHub website and log in. To create a new repository, select the + icon in the upper-right corner of the page, and select New Repository.

Name your new repository my-first-repo, to match the repository you created on your Desktop.
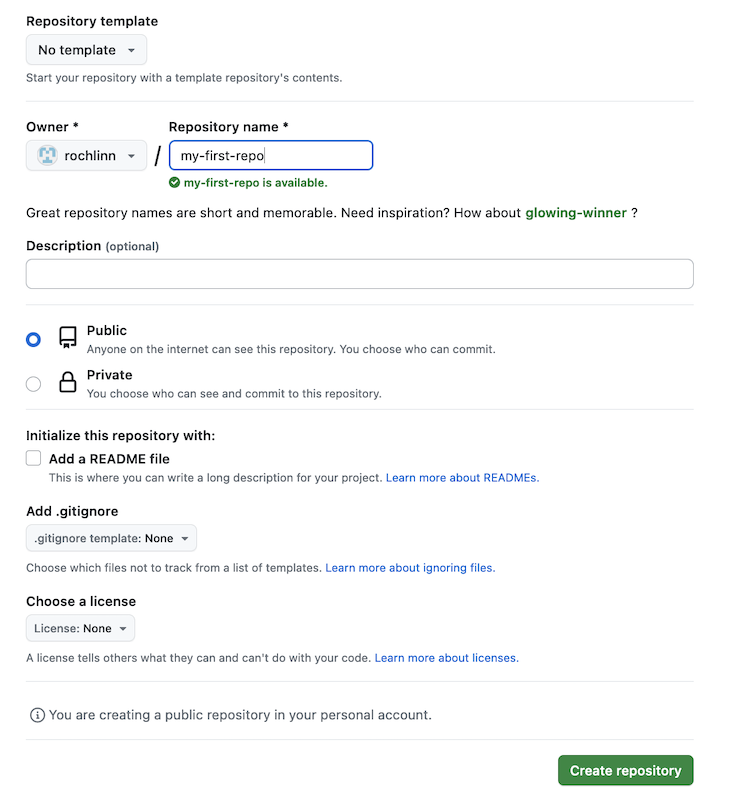
Optionally provide a description, and select whether you want your project public (anyone online can see it) or private (only contributors with permission to access the repository can see it).
GitHub will ask if you want to “Initialize this repository with’ a README.me file, a .gitignore file, or a license. Do not do any of that, we already have these files on our local machine, and we want to start with a completely empty repository on GitHub.
That’s it, click the Create Repository button.
Connect Your Local Repository to the GitHub Repository
The next page that GitHub displays contains some information to help you connect your remote repository on GitHub with your local repository on your own computer.
To make this connection, we want to tell our local repository that GitHub is the remote repository. In order to do that we need the information that GitHub displays in the “Quick setup” box on this page.
We are using the Secure Shell (SSH) Protocol, so make sure that button shows that it is selected (gray highlight) and that the address in the text box starts with `git@github. It will look something like this:

We can use the commands under the heading ”..or push to an existing repository from the command line.” to make the connection between our local repository and this remote repository, designating the repository hosted on GitHub as the remote or ‘hub’.

Let’s move back to the shell, cd to or git repository, and enter the first command:
git remote add origin git@github.com:yourname/my-first-repo.git
Make sure to use the URL for your actual repository user name rather than
yourname: the only difference should be your username instead ofyourname.
This tells git, add a remote repository called ‘origin’ that is located at github.com:yourname/my-first-repo.git. origin is the nickname we’re telling our local machine to use to for the following long web address. After we enter this command, we can use origin to refer to this specific repository in GitHub instead of the URL.
At this stage your git repository now ‘knows’ that there is a remote and where it is, so they can talk to each other.
We can check that it is setup correctly with the command:
git remote -v
This should result in the following output:
origin  git@github.com:<your_github_username>/my-first-repo.git (fetch)
origin  git@github.com:<your_github_username>/my-first-repo.git (push)
This indicates that when we pull, or fetch, updates, we get them from the url at origin and when we push updates, we send them to the url at origin.
The second line branch -M main isn’t really necessary. Legacy installs of git defaulted to master for branch naming; this is changing, and now git uses main. This line simply force renames the current branch to main in case this hasn’t already been done.
Pushing Changes
Next we push our local files, edits, and tracking history. git push takes two arguments, where we’re pushing to and where we’re pushing from - in this case, we indicate that we’re pushing to origin from main. The -u flag cements this in memory, so that we don’t need add the to and from arguments in every subsequent push and pull. We only use the -u flag at set up, after which we simply say git push.
git push -u origin main
You should get a report that looks something like:
Counting objects: 3, done.
Writing objects: 100% (3/3), 226 bytes | 0 bytes/s, done.
Total 3 (delta 0), reused 0 (delta 0)
To https://github.com/<your_github_username/my-first-repo
  * [new branch]      main -> main
Branch main set up to track remote branch main from origin.
If you now reload your browser, you should see you files sitting there.
And back in the terminal, we can check where we’re at with git status, which now indicates that there is a branch called main located at origin and that we’re up to date with it:
git status

On branch main
Your branch is up-to-date with 'origin/main'.
nothing to commit, working tree clean
Investigating differences between fils
Git version control works by tracking changes - additions and deletions - to text files. Git has a tool diff that we can use to explore the differences between files.
Start by adding another line to our readme.md file. I’m going to add, “And what a world it is!”, but feel free to add whatever you’d like.
We can now use the git diff command to see changes we have made before making a commit.
git diff
Output:
diff --git a/readme.md b/readme.md
index 3b18e51..4325e02 100644
--- a/readme.md
+++ b/readme.md
@@ -1 +1,4 @@
hello world
+
+and what a world it is!
The command produces lots of information and it can be a bit overwhelming at first, but let’s go through some key information here:
- The first line tells us that Git is producing output comparing the old and new versions of the file.
- The second line tells exactly which versions of the file Git is comparing:
3b18e51and4325e02are unique computer-generated identifiers for those versions. - The third and fourth lines once again show the name of the file being changed.
- The remaining lines are the most interesting; they show us the actual differences and the lines on which they occur. In particular, the + markers in the first column show where we have added lines.
We can now commit these changes:
$ git add readme.md
$ git commit -m 'Add another line to readme.md'
If we are very forgetful and don’t remember what we just did, we can use the git log command to look at what we’ve been doing with our git repository:
git log
Output:
commit b77335984aad66f77e28aa5cc2d31a7684b08f5e (HEAD -> main, origin/main)
Author: Your Name <your_email>
Date:   Fri Oct 27 09:41:35 2023 -0700

  Add another line to readme.md

commit b77335984aad66f77e28aa5cc2d31a7684b08f5e (origin/main)
Author: Nick Rochlin <nick.rochlin@ubc.ca>
Date:   Fri Oct 27 09:34:42 2023 -0700

  Add readme.md
Pushing Changes (again)
Now, let’s have a look at the repository at GitHub again (that is, https://github.com/rochlinn/my-first-repo with rochlinn replaced with your username). We see that the readme.md file is there, but there is only one commit:

And if you click on readme.md you will see that it contains the line `Hello world!’, but not the new line we just added.
This is because we haven’t yet pushed our local changes to the remote repository. This might seem like a mistake in design but it is often useful to make a lot of commits for small changes so you are able to make careful revisions later and you don’t necessarily want to push all these changes one by one.
Another benefit of this design is that you can make commits without being connected to the Internet.
But let’s push our changes now, using the git push command:
git push
Output:
Enumerating objects: 5, done.
Counting objects: 100% (5/5), done.
Writing objects: 100% (3/3), 288 bytes | 288.00 KiB/s, done.
Total 3 (delta 0), reused 0 (delta 0), pack-reused 0
To github.com:<your_github_username/my-first-repo.git
  b773359..9d54345  main -> main
And now when we check GitHub, we can see there are now 2 commits.
Pulling Changes
When working with others, or when when making changes on different machines, we need a way of pulling those remote changes back into our local copy. For now, we can see how this works by making a change on the GitHub website and then ‘pulling’ that change back to our computer.
Let’s go to our repository in GitHub and make a change. Underneath where our readme.md file is listed you will see a button to ‘Add a README’. Do this now, entering whatever you like, scrolling to the bottom and clicking ‘Commit new file’ (The default commit message will be ‘Create README.md’, which is fine for our purposes).
For more information about README files, see RDM Documentation lesson.
Our local repository is now out of sync with our remote repository. We can see this with git status. So let’s fix that by pulling the remote changes into our local repository using the git pull command:
git pull

remote: Enumerating objects: 4, done.
remote: Counting objects: 100% (4/4), done.
remote: Compressing objects: 100% (2/2), done.
remote: Total 3 (delta 0), reused 0 (delta 0), pack-reused 0
Unpacking objects: 100% (3/3), 655 bytes | 218.00 KiB/s, done.
From github.com:<your_github_username/my-first-repo
  9d54345..b701835  main       -> origin/main
Updating 9d54345..b701835
Fast-forward
README.md | 1 +
1 file changed, 1 insertion(+)
create mode 100644 README.md
You can now see that with the ls command that the README file is in your repository.
Resolving Rejections and Conflicts
Rejections
When a file on origin has been modified – that is someone else had made a push to origin since you’ve made a pull – and you try to push a change, Git will let you know that your local work and the remote work are not aligned; in fact, you have to branches called main with different edits. Git provides some help when this happens, and this is a typical message:
git push
To github.com:vdunbar/workshop-test.git
 ! [rejected]        main -> main (fetch first)
error: failed to push some refs to 'github.com:vdunbar/workshop-test.git'
hint: Updates were rejected because the remote contains work that you do
hint: not have locally. This is usually caused by another repository pushing
hint: to the same ref. You may want to first integrate the remote changes
hint: (e.g., 'git pull ...') before pushing again.
hint: See the 'Note about fast-forwards' in 'git push --help' for details.
This is a good reason to create a local branch to work on edits, and to perform a pull into your main branch before you merge your local ‘editing’ branch into main and pushing.
If you were to run git pull now, in an attempt to reconcile these divergent branches, Git provides you with still a bit more, perhaps not terribly helpful, help:
git pull
hint: You have divergent branches and need to specify how to reconcile them.
hint: You can do so by running one of the following commands sometime before
hint: your next pull:
hint:
hint:   git config pull.rebase false  # merge
hint:   git config pull.rebase true   # rebase
hint:   git config pull.ff only       # fast-forward only
hint:
hint: You can replace "git config" with "git config --global" to set a default
hint: preference for all repositories. You can also pass --rebase, --no-rebase,
hint: or --ff-only on the command line to override the configured default per
hint: invocation.
fatal: Need to specify how to reconcile divergent branches.
Git basically telling you there are three ways to handle this issue. The differences between these options is beyond the scope of what we can cover here. We will use the merge option…this will integrate your local changes with the remote changes
git config pull.rebase false

git pull
At this stage, Git will open your default text editor and ask for a commit message! We’ll keep things simple now, and simply indicate that we’re pushing additional changes. This is tricky business though, because we’re not seeing what other changes were pushed to origin/main that we’re merging with.
Conflicts
The above is what happens when the edits that we’ve made are not in direct conflict with edits made in the remote repository; that is, we haven’t edited that impact the same file in a conflicting way.
In such situations, when you go to push, you get a similar message to what we got previsously.
git push
To github.com:vdunbar/workshop-test.git
 ! [rejected]        main -> main (fetch first)
error: failed to push some refs to 'github.com:vdunbar/workshop-test.git'
hint: Updates were rejected because the remote contains work that you do
hint: not have locally. This is usually caused by another repository pushing
hint: to the same ref. You may want to first integrate the remote changes
hint: (e.g., 'git pull ...') before pushing again.
hint: See the 'Note about fast-forwards' in 'git push --help' for details.
Having already set up merge as the option for reconciling differences, we attempt to pull, but get this message.
git pull
remote: Enumerating objects: 8, done.
remote: Counting objects: 100% (8/8), done.
remote: Compressing objects: 100% (6/6), done.
remote: Total 6 (delta 2), reused 0 (delta 0), pack-reused 0
Unpacking objects: 100% (6/6), 1.30 KiB | 190.00 KiB/s, done.
From github.com:vdunbar/workshop-test
   33057f2..ff45676  main       -> github/main
Auto-merging readme.md
CONFLICT (content): Merge conflict in readme.md
Automatic merge failed; fix conflicts and then commit the result.
Git has pulled the remotes changes, but has noticed a conflict and is asking you to look at the conflicts, and manually resolve them before committing the results and pushing again.
To figure out which file(s) has the conflict, you can read git status, which should show an output like this.
git status
On branch main
Your branch and 'github/main' have diverged,
and have 4 and 2 different commits each, respectively.
  (use "git pull" to merge the remote branch into yours)

You have unmerged paths.
  (fix conflicts and run "git commit")
  (use "git merge --abort" to abort the merge)

Unmerged paths:
  (use "git add <file>..." to mark resolution)
	both modified:   readme.md
The last line tells us where to look. If you open that file, you’ll see that it’s been modified by Git and contains sections that look like this:
<<<<<<< HEAD
Line 7 remote. This was my last day of school.
=======
Line 7 remote. This was my first day of school.
>>>>>>> ff456766d9b945af5596ce42aa4c46065bb40a1f
The content between <<<<<<< HEAD and ======= is local to your computer. The content between ======= and >>>>>>> ff456766d9b945af5596ce42aa4c46065bb40a1f is what was changed on the remote repository. To fix the issue, you (simply) delete the commentary and indicate what should be there…
<<<<<<< HEAD
Line 7 remote. This was my last day of school.
=======
Line 7 remote. This was my first day of school.
>>>>>>> ff456766d9b945af5596ce42aa4c46065bb40a1f

This was my second day of school.
You then add the file, commit your changes, and push them.
When we begin collaborating on more complex projects, we may have to consider more aspects of git functionality, but this should be a good start. Good luck on your git adventures!